Friday, April 30, 2010

Apocrypha Project II: Raven Guard


Or, as I like to call him, Battle Brother Sophomore Slump.

In retrospect I tried to do too many things at once with this figure. I tried to paint black by using multiple Badab Black washes over a pre-highlighted dark gray base (which, I think, will work beautifully with more practice). The 'unthinned paint' look comes from me doing 1 or 2 too many washes, and from areas that I tried to touch up with barely thinned Chaos Black after the fact.

My big mistake, though, was that I was also trying to work on my painting speed. From a primed figure, I painted him to completion in about an hour and half by using a hairdryer to dry the washes.

I know, I know. Don't do that. Blah blah blah. Whatever. If you use a high heat/low speed setting and hold the mini about 24 inches from the muzzle, you're golden.

No, speed was a factor in that I didn't take enough time looking at the model. Oh well. You live and you learn. I plan on at least painting one more black miniature for this project, and I won't rush it.


And more than anything, this picture convinces me that this is worthwhile project. 20 or 30 of these guys lined up should really be a sight to see.


Oh! I almost forgot. Much grass to thegrimdark for the tips about photographing black models. Thanks!

Wednesday, April 28, 2010

Roadblocks, and a Product Review

I've reached a few stumbling points with the Apocrypha Project. First off, black is even harder to photograph than it is to paint.


See what I mean? Awful. That poor, poor Raven Guard. I was really looking forward to getting clearer shots in the hopes of soliciting some advice with the armor, especially highlighting. But, with pictures like these (this one is pretty heavily processed, even) it's not really worth it. I'm going to get the lighting situation sorted before I do too much more with this project. I've mostly finished 2 out of 20 to date, aside from decals. So far so good, considering all the other things I've got going on.

Speaking of decals... THE PRODUCT REVIEW!

TESTORS CUSTOM DECAL SYSTEM


Don't buy it. How's that for a review?

Seriously. For ten bucks you get some worthless software (whose only notable feature is an 'Order more paper!' button), ONE sheet of 8"x6" clear transfer paper, and a 3 ounce can of decal sealer. And the decal sealer sells for about $4 a can.

It made me so angry, I had to paint an ork.


Actually he kind of painted himself. Most fun I've had painting a model since I built that Revell '65 Impala.

...Jeez. I really need some better lighting.

Friday, April 23, 2010

Apocrypha Project I: Blood Angels

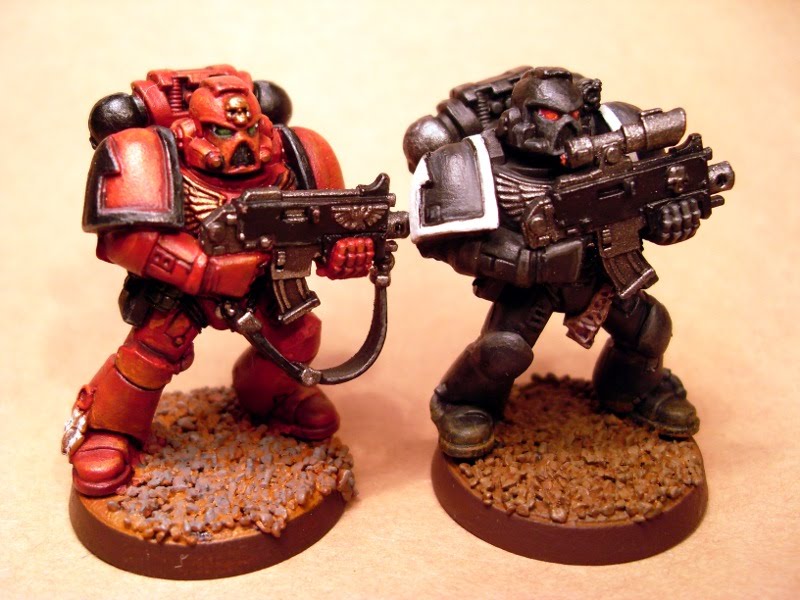
Well, after not much ado, here t is- the first part of the Apocrypha Project. I opted to start with a Blood Angel due to the overwhelming number of fantastic 'How to Paint Blood Angels' tutorials available now. Also, having an example of the flavor of the month such an astounding Chapter couldn't possibly hurt my traffic any.

I am nothing if not mercenary.

I paint at a snails pace. Ruining this Marine took about 3 hours spread out over a week. I just started a new job; and between that and my kids (all 4 of them) I was a bit busy, so painting was constantly interrupted (as usual). It can take me months to paint a single combat squad.

For what I hope are fairly obvious reasons, I chose to use a brown spray primer. In this case, Krylon Ruddy Brown Indoor/Outdoor Primer. And yeah, I always have sand on my bases before I prime. The few times I've saved basing for last like you reasonable people do, it... wasn't pretty.

Here he s after the 2 coats of very thin Plaid Folk Art (PFA) Cardinal Red. At this point I started thinking that I could have just given the primer a red wash and called it a day, but I soldiered on.

I continued with an almost-wash of PFA True Burgundy (roughly 1:8 paint to water). If I use a similar technique in the future, I'll be sure to add some flow improver and possibly a little red ink to the mix to make t behave more like the GW washes. The burgundy was followed with an all-over dousing of GW Devlan Mud and another coat of the watered down True Burgundy. I wish I had a picture of that stage; it was a gorgeous, rich red. Really made me feel like I knew what I was doing.

I was wrong.

Next the non-red bits were covered.. The blacks, the metallics, the eyes, all that good stuff. I was especially happy with his grenade, which I painted with a GW Chaos Black/Mithril Silver mix that I keep around (about 3:2), and the gave it 5 or 6 Thraka Green washes. It gave me an awesome look that would be great on larger areas, but kind of gets lost on such a small detail.

Then I highlighted the black areas with PFA Steel Gray. I got a little overzealous, and tired to correct it by dabbing on some Badab Black... and I got a little overzealous with that, and decided to quit while I was ahead.

I was, at this point, still ahead. That was all about to change.

I decided to very carefully apply Badab Black in the deepest recesses of the armor. I started low and worked my way up, being oh-so-careful, and using barely-most paper towel to dab up any excess wash.

It looked great. I was really proud of myself. Right up until the point that I set the Marine down, and realised that all the moving and twisting and flipping and gripping I had to do to get the wash into all the little nooks and crannies that GW has so thoughtfully detailed their miniatures with had caused the Badab Black to run and smear all over the figure.

I was beside myself. I really didn't know what to do. I panicked, and decided to try to 'fix' it by starting the highlights and pulling the up much further than I had intended.

I used a mix of GW Blazing Orange, water, and Liquitex retarder (to give me time to pull the highlights up) and went a little nuts. You can't really see it in the pictures, but the orange goes way too far from the edges, and really makes the miniature look kind of dusty. I suppose that this is one of the rare occasions where the pictures actually look better than the real thing.


I'm griping, but overall, I'm pretty happy with the results. You can tell it's a Blood Angel, and I stretched my skills and tried some new things to get there.

Oh... and if you're wondering about the lack of a blood drop, it's coming. I'm gong to be using Sol/Set and decals on this project, and I don't have any BA decals at the moment.

If you made it this far, thanks. Below are the notes I kept while I was panting. If you feel like offering any C&C, that's what to base it on. The 'recipe' is more complete than what I've written above.

Sunday, April 18, 2010

Apocrypha Project

I'm not afraid to admit it- I'm something of a fool.

I've made two errors lately due to total inexcusable newbishness. I purchased a Predator instead of a Razorback (don't ask). And I had intended to use the AoBR tactical squad with my Marines Cruor Dexter.

Why is that a mistake? Well, I didn't realize that the AoBR marine's squad markings are moulded in. And I don't intend to use them with my little dudes. It just doesn't ft with the fluff that's clogging my head.


Oops.

I was pretty upset... at first. I even went so far as to gouge off the arrow on one of them, to see if I could salvage my "vision", such as it were.

I wasn't happy with the result. As they stand, the AoBR Tactical Marines are sketchy, a trait they share with the Battle for Macragge Tactical Marines, and it would be entirely too easy to ruin them all by scraping too much plastic off of their shoulder pads.

And then... something clicked in my head as I looked at the AoBR guys next to the Macragge marines I already have painted. They are so static and unexciting, it's almost like they are museum pieces.

Click.

That's exactly what I'm going to do. With these new recruits, and my extant Marines.

My new backburner project? To paint each of these guys up as a representative of a different Chapter. I think it will be fun, and good practice to build up my painting chops.

Wish me luck... not only with the painting, but with the whole paying attention to the Codex before I go shopping.

Stupid Predator...

Saturday, April 10, 2010

The First is the Worst... I Hope.

This is the first piece I've painted from the AoBR set, and it's also the first terminator I've ever painted. At first I wasn't sure how the Marines Cruor Dexter pant scheme would carry over to the larger model, but I am more than happy with it (my technique, not so much).


I'm not totally sold on the bisected shieldamajig, but I think that's more a case of me balling it up than the design being flawed. Perhaps on the next one I'll make sure that the gold separation is a little more centered, an maybe do a super fine black line on either side of the gold stripe to really make it pop. As it is, it sort of blends in, especially with the red half.


I'm ecstatic with the way the gold details came out on this model. It's probably not noticeable to anyone other than myself, but it's a huge improvement over what I've done in the past and I really like the way it looks. The gold areas were basecoated with Snakebite Leather, then Dwarf Bronze. Then the whole model was drowned in Badab Black, the gold was given a dose of Chestnut Ink, and then highlighted with Burnished Gold.

I think it looks fantastic, and even more so from about 3 feet away (especially the Crux Terminatus). And that's exactly what I was going for... just ignore the unpainted purity seal. Oops.


Of course, this sot from the rear really illustrates how much I need to work on my highlighting. Not just brush technique, but also visualization. I failed here... but I'll fix it, and get it right the first time on the other 4 I have to paint.

Thursday, April 8, 2010

Wichit... err... Naggaroth Linemen


Well, here they are, the linemen for my Naggaroth Nightmares Blood Bowl team.

If they look a little rushed, it's only because they were. My wonderful gal gave me the Assault on Black Reach set for my birthday, but I promised myself that I'd at least finish these line-elves up before I started painting any of my new toys.

So, of course, I got impatient and did a poor job (even for me) in my haste to get into my new box of grey crack. That, and something about these figures prevented me from enjoying painting them in the first place- something to think about. Maybe I should have traded them for another team that sparked my imagination. I'm not completely disgusted with them, and I intend to finish the rest of the team and (someday, someday...) play with them. But I know that I could have done a much better job of it if I had just been patient.

Oh well... At least they are metal, and can be stripped easily.

For now, though, I need to figure out how to pant Terminators ad Dreadnoughts for my Marines Cruor Dexter.

Saturday, April 3, 2010

Obvious Tip is... Well, It's Obvious.


This is such a painfully obvious thing, but I've seen people recently who hadn't picked up on it so I figured I'd just throw t out there.

PLASTIC GLUE DOES NOT STICK TO PAINT SO GOOD.

So, when you are priming a model in multiple pieces, mask off the bits that you are going to be dabbing glue on. Once the paint is dry, you can pull off the tape and you've got naked plastic ready for adhesemintizingination.


Simple? Yeah. Obvious? Youbetcha.

Such a basic concept that it's incredibly easy to forget?

Right on.